ShopDreamUp AI ArtDreamUp
Deviation Actions

Friend with Benefits | Mission Supporter
Support my creative endeavors and become a part the MELO SPACE community as a Mission Supporter! 100% of profits are reinvested into creative content, community benefits, & operating costs (gear, supplies, server expenses).
$4/month


Suggested Deviants


Suggested Collections
![[MMD] Lanterns [REMOVED]](https://images-wixmp-ed30a86b8c4ca887773594c2.wixmp.com/i/20a57054-d66e-49e4-9e44-65dd673cee29/d84m7il-c23b66ca-3e9b-4ab5-8111-2389c2cef04b.jpg/v1/crop/w_184,h_184,x_0,y_23,scl_0.115,q_70,strp/_mmd__lanterns__removed__by_wampa842_d84m7il-92s-2x.jpg)
![[MMD] Lanterns [REMOVED]](https://images-wixmp-ed30a86b8c4ca887773594c2.wixmp.com/i/20a57054-d66e-49e4-9e44-65dd673cee29/d84m7il-c23b66ca-3e9b-4ab5-8111-2389c2cef04b.jpg/v1/crop/w_92,h_92,x_0,y_12,scl_0.0575,q_70,strp/_mmd__lanterns__removed__by_wampa842_d84m7il-92s.jpg)


![Foldable Letter/Paper- with bones [DL]](https://images-wixmp-ed30a86b8c4ca887773594c2.wixmp.com/i/1b6aa1f3-362b-41af-86a8-f6b67f95235b/d7shh9o-f04b8f4f-1f9d-438d-8d46-ddf44992c6c1.png/v1/crop/w_184,h_184,x_21,y_0,scl_0.26705370101597/foldable_letter_paper__with_bones__dl__by_wintrydrop_d7shh9o-92s-2x.png)
![Foldable Letter/Paper- with bones [DL]](https://images-wixmp-ed30a86b8c4ca887773594c2.wixmp.com/i/1b6aa1f3-362b-41af-86a8-f6b67f95235b/d7shh9o-f04b8f4f-1f9d-438d-8d46-ddf44992c6c1.png/v1/crop/w_92,h_92,x_10,y_0,scl_0.13352685050798/foldable_letter_paper__with_bones__dl__by_wintrydrop_d7shh9o-92s.png)


![[MMD] Cigarette](https://images-wixmp-ed30a86b8c4ca887773594c2.wixmp.com/f/8cb9fe4d-c9a2-4a21-bf4c-1b49db86ce80/dbc8d6b-dbf4bcf2-b45e-49f2-bb35-97f74f49a984.png/v1/crop/w_184,h_184,x_36,y_0,scl_0.17037037037037/_mmd__cigarette_by_lorenemmd_dbc8d6b-92s-2x.png?token=eyJ0eXAiOiJKV1QiLCJhbGciOiJIUzI1NiJ9.eyJzdWIiOiJ1cm46YXBwOjdlMGQxODg5ODIyNjQzNzNhNWYwZDQxNWVhMGQyNmUwIiwiaXNzIjoidXJuOmFwcDo3ZTBkMTg4OTgyMjY0MzczYTVmMGQ0MTVlYTBkMjZlMCIsIm9iaiI6W1t7ImhlaWdodCI6Ijw9NTc2IiwicGF0aCI6IlwvZlwvOGNiOWZlNGQtYzlhMi00YTIxLWJmNGMtMWI0OWRiODZjZTgwXC9kYmM4ZDZiLWRiZjRiY2YyLWI0NWUtNDlmMi1iYjM1LTk3Zjc0ZjQ5YTk4NC5wbmciLCJ3aWR0aCI6Ijw9MTAyNCJ9XV0sImF1ZCI6WyJ1cm46c2VydmljZTppbWFnZS5vcGVyYXRpb25zIl19.phfwecO707zHL0hNl0THe1PaPK0PbNSuTqModcIyDU0)
![[MMD] Cigarette](https://images-wixmp-ed30a86b8c4ca887773594c2.wixmp.com/f/8cb9fe4d-c9a2-4a21-bf4c-1b49db86ce80/dbc8d6b-dbf4bcf2-b45e-49f2-bb35-97f74f49a984.png/v1/crop/w_92,h_92,x_18,y_0,scl_0.085185185185185/_mmd__cigarette_by_lorenemmd_dbc8d6b-92s.png?token=eyJ0eXAiOiJKV1QiLCJhbGciOiJIUzI1NiJ9.eyJzdWIiOiJ1cm46YXBwOjdlMGQxODg5ODIyNjQzNzNhNWYwZDQxNWVhMGQyNmUwIiwiaXNzIjoidXJuOmFwcDo3ZTBkMTg4OTgyMjY0MzczYTVmMGQ0MTVlYTBkMjZlMCIsIm9iaiI6W1t7ImhlaWdodCI6Ijw9NTc2IiwicGF0aCI6IlwvZlwvOGNiOWZlNGQtYzlhMi00YTIxLWJmNGMtMWI0OWRiODZjZTgwXC9kYmM4ZDZiLWRiZjRiY2YyLWI0NWUtNDlmMi1iYjM1LTk3Zjc0ZjQ5YTk4NC5wbmciLCJ3aWR0aCI6Ijw9MTAyNCJ9XV0sImF1ZCI6WyJ1cm46c2VydmljZTppbWFnZS5vcGVyYXRpb25zIl19.phfwecO707zHL0hNl0THe1PaPK0PbNSuTqModcIyDU0)


You Might Like…


Featured in Groups

Description
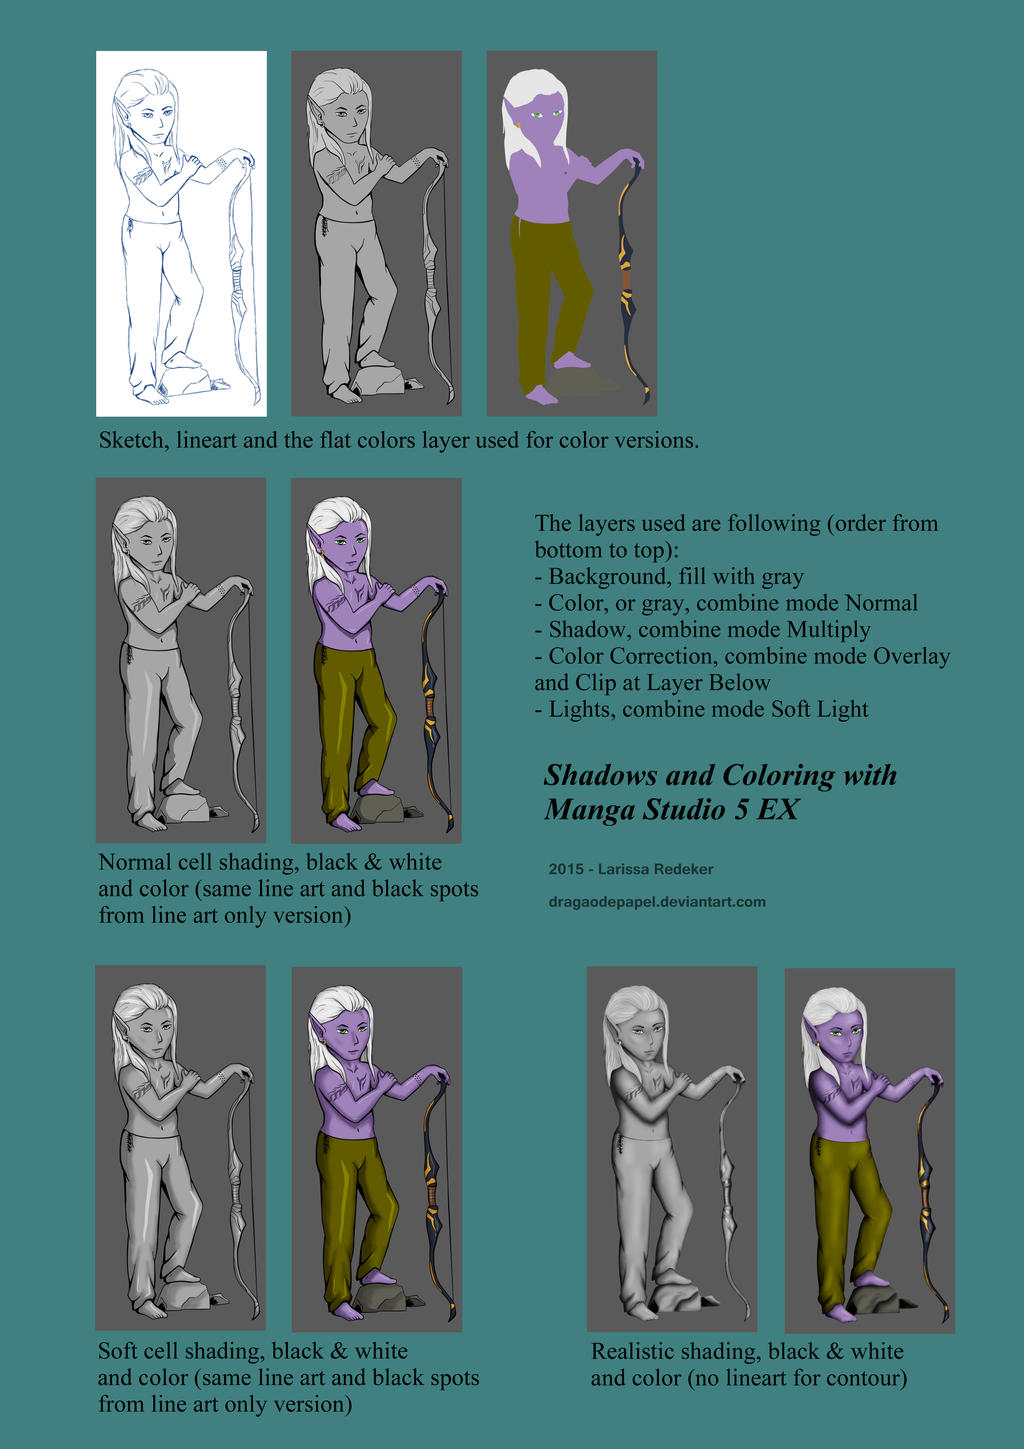
I got a drawing of chibi version for my char, Rus, to play with variations on finishing and coloring a drawing. I wanted a simple way to switch between black and white and color versions of the same drawing.
This is very simple, you need only to play with layers and its Combine modes. For this I used MangaStudio 5 Ex, but I think that any painting software, that is able to work with layers, can be used.
In this example, versions like Lineart only (good for black & white comics and internal book illustrations), Cell Shading, Soft Cell Shading, and Realistic Shading.
Let's go to the steps used in each type:
First I made the sketch of the drawing, with blue color and a lighter Pencil.
For the lineart I created a Vector layer, and with Continuous Curve tool with brush size of 3.0, I draw all the lines of the art. The layer was called "lineart mono".
Then I made a copy of this layer and hide it, the new layer is called "final lineart", and with the Correct Line Width tool I changed manually the width of each part of the lines, trying to give to it a hand drawed look. The heavy black spots were made in a separate Raster Layer below the lineart layer.
The background is a layer filled with medium gray.
The flat color layer was created in an easy way: the final artwork and black layers are hidden, and the "lineart mono" is visible and selected. With the Auto Select Tool I seleted each area of a particular color. Then selected the color, the color layer and filled the area with the Fill Tool. Made it for each color of the drawing.
The light gray used for filling was easier to create: with the color layer selected, Layer->Selection from Layer->Create Selection, then created a new layer and fill the selection with a light gray.
The shadows, no matter what type, are created in Raster Layers, with Expression Color set to Gray (to ensure that it will be real grayscale) and Combine mode set to Multiply, above the color layer. The I used the techniques for cell or realistic style. For Cell Shading, Lasso Marquee and the Marker, with a light gray, to create the shadow areas. For the realistic, I used the Airbrush Tool with different shades of gray.
The highlights is the same, but the layer has the Combine Mode set to Soft Light.
Now a thing that made a lo of difference in the final drawing. With the shadow layer in Multiply above the color layer, you will get a flat, "died" range of colors. What I made to correct it to create a new layer on top of the shadow, set the Combine Mode to Overlay and choose the option "Clip at Layer Bellow", then fill the areas with the colors. So I can used some other colors in this layers to change how the flat color will look.
Image size
2894x4093px 2.69 MB
© 2015 - 2024 dragaodepapel
Comments0
Join the community to add your comment. Already a deviant? Log In